To send a weekly blog post update in Fluent CRM, create a Recurring Campaign in the Emails section, set the frequency to weekly, and use the “Latest Post Block” in the email editor to automatically display recent posts. This automates sending, allows customized post layouts, and ensures subscribers receive the latest content on a set schedule.
 Step-by-Step Guide
-
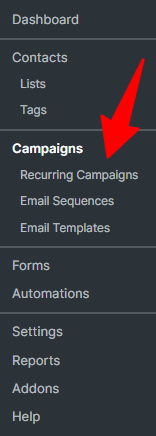
- Navigate to Recurring Campaigns: Go to your WordPress Dashboard \(\rightarrow \) FluentCRM \(\rightarrow \) Emails \(\rightarrow \) Recurring Campaigns.
- Create New Campaign: Click on Create New Recurring Campaign.
- Set Frequency: Assign a name (e.g., “Weekly Blog Update”), set the frequency to Weekly, and choose the specific day and time.
- Define Content (Latest Post Block):
-
- In the email editor, add the Latest Post Block by typing
/and selecting it. - Configure the block to show recent posts, adjust the number of posts, and select whether to display featured images or excerpts.
- In the email editor, add the Latest Post Block by typing
-
- Select Recipients: Choose the targeted mailing list or tags for the newsletter.
- Activate: Save the campaign and set it to Active to start the automatic weekly, scheduled emails. [1, 2, 3, 4]
Key Tips
- Use Merge Codes: Use
{{other.latest_post.title}}in the subject line to automatically update the email subject with your latest post title. - Review Option: You can uncheck “automatic email sending” initially to review the generated draft before it goes out.
- Fix Layouts: Use
clear:bothin CSS if images cause text-wrapping issues in email clients. - Email Logistics: Ensure Fluent SMTP is installed to ensure reliable email delivery. [1, 2, 3, 4, 5]